Sunday 7 July 2019

Seven Hills Crafts Appreciation Day!

Seven Hills Crafts is a wonderful online craft store based in the north of England which specialises in supplying products from the USA that are usually hard to come by in the UK. The store is run by the lovely Tara and Rick, who do a marvellous job in keeping their many customers happy with copious amounts of stamps, dies, ink etc. You can check out their fabulous site here https://sevenhillscrafts.co.uk .

Customers of the store are invited to join an exclusive Facebook group called SCH VIP's, where many of us share photos of our creations and chat about craft related stuff, latest releases etc. Seven Hills Crafts Customer Service is second to none and Tara and Rick are very much appreciated, so the group decided that the seventh day of the seventh month (for Seven Hills) should henceforth become SCH appreciation day! Many of us have made and sent cards to show them some love - here is my version.


I chose to use Altenew's Adore You stamp and die sets, together with a Hello die. I stamped the flowers onto some peach pearlescent card using Versamark ink and heat embossed with detail white embossing powder. Then I added some pink and white shading to the petals with my Faber Castell Polychromos pencils. The leaves were stamped and heat embossed onto pearlescent green gold card in the same way, before everything was cut out using the co-ordinating dies. I layered everything up, including a lattice oval die behind the flowers and added the die cut sentiment with foam tape.


The sentiments on the inside of the card were also from the Altenew Adore You stamp set, which is available from Seven Hills Crafts here https://sevenhillscrafts.co.uk/adore-you.html .


I also enclosed a small gift for Tara, appropriately a card pin which I bought from Ruby at The Gray Muse. I hope she likes it!


Thanks for looking. 

Friday 5 July 2019

Nautical Collage Cards.

I needed a birthday card for one of my Uncles this week. Years ago he used to go sailing, so I decided to use some Clear-2-Collage stamps from Butterfly Kisses to make a couple of nautical themed cards.


I used C6 size Kraft card blanks and layered them with some lovely patterned papers from Kaisercraft's Deep Sea collection. I inked up the large collage stamp with Versafine Clair Pinecone ink and stamped onto Kraft card, then coloured parts of the image with Faber Castell Polychromos pencils making sure to keep the colours neutral. The sentiments in my first card were both from the same stamp set and I cut them into small flag shapes using My Favourite Things Stitched Sentiments Strips dies.


For my second card I chose a different patterned paper and used one of the tiny sentiment tags which Kaisercraft had also supplied in the Deep Sea paper pad. A short length of string finished off the tag nicely, which I then added to the card with foam tape. I have added this to my card stash in case I need a masculine card in a hurry. 

Thanks for looking!

Thursday 6 June 2019

Eid Mubarak cards and dinner

On Tuesday evening my husband and I were kindly invited to join our next door neighbours and their family for a dinner to celebrate Eid. So I decided that it would be nice to make them some cards to take with us, although I've never actually made an Eid card before. Altenew and Hero Arts came to the rescue as I found the perfect stamps and dies in my stash and set to work.


For my first card, for our hosts, I chose a large square ivory pearlised card blank. I started with the gorgeous Floral Tile Bold Prints 6" square stamp by Hero Arts and stamped it onto thick white card with Versamark ink before heat embossing with detail gold embossing powder. I then painted it with Zig Real Brush watercolour markers, which took ages but was very therapeutic!
The finished panel was then layered onto shiny gold card, then onto the card blank. I used Versamark ink and WOW metallic gold rich super fine embossing powder to stamp the Eid Mubarak sentiment from Altenew's Eid Al Adha stamp set onto a strip of purple card and added it with foam tape. I used the large Eid Mubarak die from Altenew for the focal point, cutting three from white card and one from shiny gold card and gluing them together for dimension. I must say that I am quite pleased with the finished result!


I needed three more cards for the other guests, that weren't going to be so time consuming to make, so I turned to the lovely Eastern Influences craft papers from Craft Consortium. I trimmed a sheet down to fit onto 6" square white card blanks, leaving a narrow white border showing. The lanterns and buildings from the Altenew Eid Al Adha stamp set were stamped directly onto the patterned paper using VersaFine Clair Nocturne ink, which gave a really good impression. I used my MISTI to position the stamps so that I could stamp them repeatedly in exactly the right place. How did we manage before the MISTI was invented?! 
The Eid Mubarak sentiment was heat embossed in gold onto red card, which was cut out using one of the My Favourite Things Stitched Sentiment Strip dies. Again I used foam tape to mount this to the cards for dimension. 


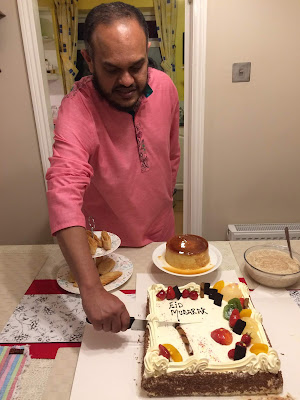
Nasima our hostess is an excellent cook, but I didn't take any photos of the main course at dinner as all the other guests were hungry, having just finished fasting for the month of Ramadan. There were lots of happy faces afterwards, especially when one of the guests produced an enormous cake, decorated with fresh fruits and chocolate. 


Here is Farhan, cutting the cake into generous slices. It was really delicious! We were made to feel very welcome and were honoured to have been invited to share in the family celebration.  A huge thank you to our hosts Hemayet and Nasima - we had a lovely time.


Although I had never made an Eid card before, they were all well received. It just goes to show that you shouldn't be afraid to try new things and make new friends!

Saturday 1 June 2019

Altenew Washi Sympathy Cards

Recently we lost my Auntie Pat to Cancer so I found myself in need of several sympathy cards. These are never easy to make when you need them, so I decided to design three cards and make a few multiples of them so that I'd have some spare cards to hand when I require them in future.

Altenew have a range of really beautiful, wide washi tapes and I thought that the stunning Botanical Rhapsody (which is simply printed black on white) would be ideal for making Sympathy cards.


I started by covering three large (A3) sheets of white card with the washi tape, smoothing it down with a bone folder as I stuck it down. Then I cut several card fronts with my paper trimmer - I managed to get four 5" x 7" panels, four 6" square panels and had just enough left for three strips to add to DL cards. I stuck these to the card blanks using double sided tape, before adding various sentiments.


For the four 5' x 7" cards I used Altenew's Thinking of You die to cut several sentiments from black card. I stacked and glued three sentiments together for each card, to add some extra dimension. The "with deepest sympathy" sentiment is from Altenew's Wildflower Garden stamp set and I chose to stamp it with Versamark ink and heat emboss with detail white embossing powder onto black card. I cut the card into flag shapes and used foam tape to mount them onto my card fronts.


The 6" square cards were made in a similar way, but I used black card blanks and trimmed the panels down a little so that a narrow border was showing.


The Sympathy die that I used for these is by Sugar Pea Designs. Again I glued three of the words together before gluing them to my card. Lawn Fawn's fundamentals glue tube is perfect for this as it has a really fine applicator tip and the glue dries clear too. 


The "Thinking of You" sentiment is from Altenew's Beautiful Inside stamp set. I also used one of the longer messages from the set for the inside of each card. 


On the remaining three panels I decided to colour in the washi tape background using my new Faber Castell Polychromos pencils. I don't have many of these yet as I've just started my collection by buying a few individual pencils, but they are so lovely to use that I'm sure I'll be adding some more colours as soon as I'm able to. The coloured panels were then matted onto purple card and then added to black DL card blanks. The "with sympathy" sentiment is one of Altenew's Painted Greetings stamps and again I used white embossing powder on black card. I used My Favourite Things Stitched Fishtail Sentiment Strip dies to cut out the sentiments and added them with foam tape for dimension.


I was really pleased that I'd managed to make eleven cards in total and that I won't be caught short next time I need to send a sympathy card. 

The Altenew washi tape roll is a generous ten metres long (x 175mm) so I have plenty left to make some more cards in future. The lovely botanical design would lend itself well to lots of occasions and I'm looking forward to colouring in some more card panels in brighter colours to make some happier cards next.


Wednesday 27 March 2019

Layered Daffodils

What could be more Spring like than a host of golden daffodils? The recent warmer weather here inspired me to try out the beautiful Altenew layered daffodil die collection, which was a free gift with issue 188 of Simply Cards & Papercraft magazine. There are seven dies in the set, which can be cut out and layered to produce a detailed daffodil flower, stem and leaf. I spent an evening in front of the TV whilst I die cut loads of coloured card and I found it quite addictive, as I managed to make enough flowers to make a total of nine cards!


My first three cards were made on ivory 5" x 7" card bases in a portrait orientation. Each has a layer of subtle patterned paper from Craft Consortium's Watercolours collection, which was topped with a Tailored Expressions Lattice Frame die cut in a co-ordinating colour. 


The birthday sentiment is from Altenew's Build-A-Flower Sakura Blossom stamp set and was heat embossed with WOW embossing powders to match each frame. 


I used "Stick-It" adhesive sheets when die cutting all of the elements, so that it was easy to layer them up and to adhere them to the frames. The flower heads were added with foam tape for dimension. 


The remaining cards were all made with white 5" x 7" card blanks in a landscape orientation. 


The happy birthday sentiment on the first one is from Altenew's Painted Greetings stamp set and was heat embossed with White Super Fine Detail embossing powder by Ranger.


Again the patterned papers used are from Craft Consortium's Watercolours collection.


For my last three cards I changed to using patterned papers from Paper Boutique's Tutti Frutti collection.


I swapped the stamped sentiment for the lovely scripty hello die cut, which is from Altenew's Simply Hello die. I adhered these using Lawn Fawn's glue tube, which has a fine tip that made it really easy to get the glue where it was needed.


Now I have plenty of cards in my stash for all of those Spring birthdays that are coming up!


Thanks so much for looking!


Thursday 14 March 2019

More Playful Peacocks

I'm back with some more cards that I've made with the My Favourite Things Playful Peacock stamps and dies. This is a lovely set with three peacock images, some small flowers and leaves and six useful sentiments. I have quite a few birthdays coming up so I made three birthday cards and an encouragement card, all using the forward facing peacock image.


I started with 6" square card blanks and all four cards are of a similar layout. Each has a background layer of MFT plaid or floral paper. They have some gorgeous designs and I was spoilt for choice!


The next two layers were cut with dies from the MFT Stitched-Tag Corner Square Die-namics and the sentiments were stamped with MFT Tropical Teal dye ink.


I used the same ink to stamp the peacocks, which I then coloured with Copic Ciao markers before cutting out with the co-ordinating dies. The peacocks were shaped slightly so that their tail feathers sloped backwards towards the top and then affixed to the card panels with foam tape for dimension. I also stamped an additional head and body for each one and used more foam tape to raise them from the main image.


I think that the last card is my favourite as I love the teal colours and the sentiment! Thanks for looking.

Wednesday 13 March 2019

Peacock Anniversary Card

Hello, today I have made an anniversary card featuring the My Favourite Things Playful Peacock stamp and die set.


I started with a 6" square pearlescent card blank and layered some pretty paper from the MFT Tiny Hearts Pastels paper pad. Then I die cut a panel using one of the MFT Stitched Tag-Corner Rectangle dynamics and stamped a sentiment from the MFT Together Forever stamp set. The two peacocks were stamped with MFT Tropical Teal dye ink and coloured with Copic markers. I used the co-ordinating dies to cut them both out and popped them onto the panel using some foam tape for dimension.  

These stamps were lovely to work with and I have lots of ideas for using the other images in the set too. Thanks for looking.

Tuesday 12 March 2019

MFT Heart Tree cards

Hello, today I'm sharing a couple of cards that I've made using the lovely Heart Tree die from My Favourite Things. I've also used their Essential Fishtail Sentiment dies, Watercolour Wash Brights paper and sentiment stamps from the Essential Sentiments and From The Heart stamp sets.


After die cutting the tree I laid some green watercolour wash paper beneath it. Then I coloured the three hearts and the tree trunk using my Copic markers and inlaid them into the spaces in the tree. The sentiments were embossed in white onto velum.


I am entering these into the My Favourite Things sketch challenge number 427. Thanks for looking.


Wednesday 20 February 2019

A Mice Time To Celebrate.

Hello, I'm just popping in to share a card that I've made using the super cute My Favourite Things "A mice time to celebrate" stamp set, which was designed by the very talented Stacey Yacula. 

I featured the colours Grout Grey, Tickled Pink, Wild Wisteria and Steel Grey and I coloured the mice with matching Copic pens. The balloon shaker windows were made with the Heart Trio Shaker Window dies and co-ordinating pouches, which I backed with papers from the MFT Tiny Hearts Pastels paper pack. I used crochet thread to make the balloon strings and tied them to the mice paws with the help of a needle and a pokey tool so that I could thread them behind the bodies of the mice. I stamped the hats, gifts and the arm of the mouse on the right twice and layered them up with Pinflair glue gel for added dimension. The sentiments were heat embossed in white onto banners cut with the Stitched Fishtail Sentiment Strip dies and added to a plain banner using foam tape. 


I'm entering this card in My Favourite Things "the birthday project challenge" which this month requires the inclusion of one or more birthday presents. 

Thanks for stopping by!

Wednesday 31 October 2018

Bundles of Blossoms

Happy Halloween! Today I am featuring two cards which I made using the My Favourite Things "Bundles of Blossoms background" stamp and Zig clean colour real brush markers. Although I've used the same stamp and layout for both cards, they each have a very different feel about them.

For my first card I used very vibrant colours as I am entering it into a "Shades of Halloween" colour challenge. I cut the word "hooray" twice in purple and orange card, using a My Favourite Things Die-namics die,  and layered them to give a shadow effect. The "Let's Celebrate You" sentiment is from the "More Essential Sentiments" set, also by My Favourite Things. I stamped it with Versamark ink and used Zing Apricot embossing powder to heat set it. The sentiment strip was then added to my card with some foam tape for added dimension.


My second card has a very Autumnal feel and features the "Celebrate" Die-namics by MFT and another sentiment from the "More Essential Sentiments" set. This time I used Wow! Primary Chartreuse embossing powder and layered the sentiment strip again to make it stand out from the background a bit more.


Each card was a labour of love as they took ages to colour in all the intricate details, but it was very relaxing to do and I think that the end results were worth it!