Thursday 28 November 2013

Happy Thanksgiving!

Today is Thanksgiving in the USA, so I'd like to wish all my American friends a very happy Thanksgiving - I am truly thankful for you all!

Earlier this week I made this autumnal themed thank you card for a friend in America who had kindly sent me some lovely crafting goodies.


I started with a square black card blank and added a layer of black and cream paper from Graphic 45's Steampunk Spells Patterns & Solids pad. Another layer of cream card was added with a stamped sentiment from the Waltzingmouse "Blessed By You" stamp set (I actually used parts of two different sentiments to get this particular combination). I embossed a small square of Core'dinations Chocolate Box collection card using a Tim Holtz Alterations Texture Fades embossing folder by Sizzix and sanded the card to reveal the coloured core inside. The oak and acorn wreath and sprigs from "Peace and plenty" by Waltzingmouse stamps were stamped onto cream card using black Memento ink. I coloured all the images with Copic Ciao markers and cut them out by hand before mounting them onto the card front using foam pads. Finally I highlighted all the acorns by giving them a coat of Ranger's Glossy Accents.

The photo above doesn't really do justice to the card as the colours were much brighter in real life. Poor daylight in the winter in England isn't really conducive to photography! I hope my friend liked it though.

Sunday 24 November 2013

Waltzingmouse November Pajama Party - Challenge 3: Tag you're it ....

Yesterday I made a set of three Christmas gift tags using Waltzingmouse stamps, which I intended to enter into the November Pajama Party over at the Waltzingmouse Makes blog. However I missed the deadline as the software which I use to download my photographs wouldn't load correctly. I managed to get it to work this morning, so I thought that I'd post them to my blog anyway!


The challenge was to create a tag that Claire Brennan (owner of Waltzingmouse stamps) would like herself. There were so many lovely Waltzingmouse stamps to chose from, many of which have fun and quirky sentiments, but in the end I decided to use mostly stamps from the "secret set" - Santa Was Here. I wanted my tags to be from Santa himself - and after all, Claire had designed all the stamps herself, so she ought to like them!


 I started by cutting three large tags from cream, mottled beige and red card stock using the Tim Holtz Tags and Bookplates Alterations die by Sizzix. Then I used the smallest die from the Waltzingmouse Opera Tags die set to cut two tiny tag toppers from each colour card and stamp them with the corresponding stamp from the Opera Tags stamp set. For this project I used just two inkpads throughout - Memento Tuxedo Black and PTI Pure Poppy. I used strong double sided tape to stick the tag toppers in pairs to the tags, punched a hole through each with my Crop-A-Dile and added a pair of red card washers to the cream one, before trimming the tops level with the top of each tag.
 
On the top  right of each tag I stamped "Ho! Ho! Ho!" from the Nutcracker Sweet stamp set. The stamp is actually set out horizontally, but I wanted to stamp the sentiment vertically to save space, so I just inked up the first "Ho!" and stamped it carefully three times beneath each other. I did the same thing with the "You're on my "Nice" list" sentiment (From Santa Was Here) to fit it onto the bottom left of each tag.
 
A lot of the Waltzingmouse stamps have been designed to fit with existing Spellbinders dies. This is such a good idea and makes it so easy to get a professional looking finish! I used a Spellbinders label die to cut three labels from cream card and then stamped them with the Santa's Workshop stamp from the "Santa Was Here" set using Pure Poppy red ink. I also stamped a further three images in black ink on cream card, fussy cut the central shaped area and layered them on top of the full labels using foam pads. I also stamped the smaller label a few more times in red and black on the cream and the mottled beige card stock and cut the different layers out - again stacking them up with foam pads. The red and beige tags actually have five layers to each of the labels (and there are four layers on the cream tag).
 
I have quite a few Spellbinders dies, so I had a look through them all to find a pretty circular shaped one that would fit the Chief Elf badge stamp (from Santa Was Here), together with a small plain circle die for the centre sentiment part of the badge. I cut four of the pretty circles from the red card, one from cream card and one from the beige card. Then I cut two small circles from cream card, one from beige card and three larger circles from the cream card. The three large cream circles were stuck to three of the pretty circles and the remaining die cuts were all stamped with the Chief Elf badge stamp and layered up using foam pads. I wanted to create a "dial" effect to show "Naughty" and "Nice" so I used a fine liner pen to write on the cream circles and made an arrow shaped pointer using one of the elf footprint stamps from the "Santa Was Here" set and the narrow chain effect stamp from the "2011 Holiday Ornaments" stamp set. I trimmed away the lower part of the dial to avoid too much bulk then stuck everything down to the tags using double sided tape. Finally, I added ribbon to the tops of the tags - printed cream twill ribbon stapled to the red tag and red seam binding tied to the other two tags.
 
Although these tags were very time consuming to make they were so much fun to do! They are also just that little bit different from anything else I've seen so I can't wait to use them on my Christmas gifts this year!


Wednesday 20 November 2013

Indigo Blu Challenge no 9 - Chocolate Orange.

This is my entry for the ninth challenge over at the Indigo Blu Challenge Blog  http://indigoblublogchallenge.blogspot.co.uk/2013/10/challenge-9-chocolate-orange.html .
This month's challenge was "Chocolate Orange" and I used the "Bare Forest 1" stamp (Code:BF 1) and the "Little Voice" stamp set (Code: LV) to stamp the Get Well Soon sentiment. I had to use separate words and letters from two of the sentiment stamps as I didn't have an Indigo Blu stamp with the message that I wanted!


The embossed panel on the right was a piece of Core'dinations Chocolate Box card stock which I embossed with one of the Tim Holtz Textured Leaves embossing folders from the Alterations Texture Fades collection by Sizzix, before sanding to reveal the orange core beneath.
 
The panel on the left was a piece of Indigo Blue perfect pastel smooth card stock which I coloured using Yellow Ochre Tint, Orange Tint and Orange Pan Pastels. I then stamped the lovely Bare Forest trees over the top with Memento Rich Cocoa ink. Both panels were layered onto Orange Zest and Chocolate Brown card stock, and an orange grosgrain ribbon was added before mounting onto a white card blank.
 
The collection of autumn leaves were die cut from the leftover card scraps using Impression Obsession leaf dies. The tiny leaves were cut using a Memory Box die. The leaves were all stuck on with foam pads of varying thickness to give a more dimensional look.
 
Not content with making just one card, I came up with a similar version for our nephew's birthday next week. The sentiment was stamped using Waltzingmouse "Compact Sentiments" and "Compact Family" stamps as I didn't have the appropriate Indigo Blu sentiment stamps.


I really enjoyed using my Pan Pastels and the Bare Forest stamp is gorgeous, so I shall definitely be trying this again (maybe wintery colours would look nice - possibly with a touch of snow).
 
 
EDITED to add that I had problems linking up my blog to the Indigo Blu Challenge blog (my stupid laptop decided to install some updates and then freeze just as I was using the inklinkz widget) - so I'm not sure if  I've actually managed to enter the challenge or not! Never mind - at least I have made two cards that I needed!
 

JustRite Challenge #108 and #109

I have two cards to show you today - both were originally made for JustRite Friday Challenges, but I misjudged the time difference between the UK and the USA and missed the deadline - twice!

Challenge #108 was a sketch and I needed to make a birthday card for a friend who likes gardening, so I went with a leafy / floral theme.

JRSketch108


I started with a mint green 6" x 6" square card blank and added a slightly smaller square of teal coloured card. Then I stamped the Leafy Background Stamp (SW - 04555) twice onto pale green card using Memento Teal Zeal dye ink and trimmed the stamped images to make four equal sized squares to fit my card front with a small gap between them. These were then stuck on with double sided tape. I chose the largest size die from the JustRite Custom Dies JB - 03990 Vintage Labels Two set to cut the label shape out of pale green card. This was then stamped with the matching large stamp from the JustRite Clear Winged Vintage Labels Two and Three (CR - 04465) stamp set, using the same Memento Teal Zeal ink. I cut a small oval from teal card using a Spellbinders die, stamped the sentiment from the same set using Versamark ink, covered it with white embossing powder and heat set it. The large label shape was layered onto the card using foam pads to add some dimension. The card was then embellished with four teal coloured rhinestones and some aqua and white mulberry paper flowers, together with a couple of leaf sprays which were cut from patterned paper using a Spellbinders die. Finally the small oval label with the sentiment was layered on top, again using foam pads for dimension, but also to cover the stems of the two flower sprays.


My second card was for challenge #109 WOW - white on white. I needed a sympathy card for a friend who had recently lost her father and immediately thought of white lilies. I wanted a classic looking card with a lot of different textures, although these are difficult to see on the photo below.

I started with a white 8" x 8" card blank and used the scalloped die from Spellbinders Edgeabilities E8 - 007 Classic Edges One to cut the right hand edge of the card. I trimmed a little off the top and bottom of the card so that the scallops were of even sizes. Then I added a panel of iridescent white quilt effect paper to cover the front of the card. I found a sheet of gorgeous satin effect card stock that I had been saving in my stash and dusted it with an anti - static bag before stamping the long lace panel from JustRite Lace Medallion Labels CR - 03905 and the large Lace Background Stamp CL - 03920 using Versamark ink. I covered the Versamark ink with WOW opaque white embossing powder and gently heat set it from underneath to prevent any scorch marks from overheating. I used the zig zag die from Spellbinders Edgeabilities E8 - 007 Classic Edges One to cut the left hand edge of the long lace border panel and the scalloped die, together with a Spellbinders heart patterned insert die to cut the right hand side. The long lace border was then adhered to the card with double sided tape and the excess was trimmed from the top and bottom so that it was flush with the card base. The lace background panel was cut out by hand, leaving a narrow border all round and then stuck to the card base with double sided tape.

I die cut a label from pearlescent white card with one of the dies from JustRite Custom Dies JB - 03990 Vintage Labels Two and then stamped the matching lily spray stamp from Floral Vintage Labels Two CL - 04455 using Versamark ink. This time I chose WOW vanilla white embossing powder and heat set again from underneath. I curved the label slightly and used foam pads (single layers down each side and double in the middle) to make the panel more prominent. I used a Spellbinders fancy tag die to cut the smaller label from a piece of satin effect card and stamped the "with sympathy" sentiment from JustRite Large Fancy Sentiments CR - 03815, using Versamark ink and WOW vanilla white embossing powder as before. The small label was then mounted on the bottom of the card using foam pads. The finishing touch was a length of white organza ribbon tied into a multi - looped bow and attached to the folded edge of the card.


I was a little outside my comfort zone making a White on White card as I love to use lots of colour, but I was pleased with how it turned out. The lace stamps are really delicate in spite of their size and the lily flower spray was just the job - although I think if I was to make a similar card again I would like to colour the flowers in very pale pastel shades to make them stand out a bit more from the background.
 
The main thing I have learnt is to check international time zones more carefully and to leave a bit more time to upload my blog posts so as not to miss the deadlines again!!!

Monday 18 November 2013

Heads up ... A Waltzingmouse Christmas

Just to let you know that the lovely Claire Brennan at Waltzingmouse Stamps is releasing some wonderful Christmas stamp sets and some delightful dies to match existing stamp sets. You can check them all out on her blog here http://waltzingmouse.blogspot.co.uk/2013/11/a-waltzingmouse-christmas.html . Everything is now firmly on my stash wishlist - Santa I have been really good this year!

There is also a blog hop from the incredibly talented Waltzingmouse Design Team, so if you're stuck for ideas for Christmas cards I suggest you check it out. You can't beat a bit of crafty enabling!

Papertrey Ink Make It Monday challenge # 140: Ink Pad Designs

Hello there! The Papertrey Ink Make it Monday challenge this time was to use ink pads direct to paper to make the main design for a card. I had a play with some of the small cube ink pads to start with, but wasn't happy with the results so I switched to using the larger curved ink pads. The shape of these reminded me of paisley designs - so that's what I tried to recreate here.

I took an A5 sheet of white card and used three ink pads (Aqua Mist, Hawaiian Shores and Ocean Tides) to "stamp" randomly all over the card. Then I took the smallest stamp from the "Lovely Layers" stamp set and stamped in between the paisley shapes using the same three ink colours. Four more stamps from the same Lovely Layers set were used to decorate the paisley shapes, again with the same inks but this time using the Fresh Snow hybrid ink pad as well. When I'd finished stamping I took a fine black pen and doodled around the edges of each shape to give a faux stitching / lace effect.

I decided that there was enough of my patterned card stock to make two slightly different cards. For the first card I trimmed a square and matted this onto a slightly larger square of Hawaiian Shores card stock, before layering this onto a white 6" x 6" card blank. I used True Black ink to stamp the words "it's your" from the "Wonderful Words: Birthday" stamp set into a gap at the right hand side. Then I die-cut the word "birthday" from Hawaiian Shores card stock, over stamped it with the matching stamp in the same colour ink and stuck it to the card using thin strips of foam tape for dimension.


For my second card I took the remaining patterned piece and joined it to a similar sized rectangle of Hawaiian Shores card stock before trimming it into a square shape. The join was covered with a length of Hawaiian Shores 3/8" twill tape to which I had tied a bow and then the whole piece was adhered to a 6" x 6" white card blank. I stamped the word "happy" from the Wonderful Words: Birthday stamp set using True Black ink then adhered the word "birthday" which I had die-cut from white card stock.


I must apologise for the quality of the photographs as they were taken when it was dark and don't really show off the colours very well. I was really pleased with the finished cards though and think that these designs in this colourway would be equally suitable for a man or a woman.

Friday 15 November 2013

Thanks Sew Much ...

This afternoon I had an appointment with my Careers adviser Jane. She is a lovely lady who was ever so helpful and, as this was my final appointment with her, I wanted to give her a thank you card.


This is another variation of the patchwork card from my post here http://thehardystamper.blogspot.co.uk/2013/11/coordinations-hard-core-crop-challenges.html , this time with a green frame and a combination of four different embossed and sanded hexagons. I used Core'dinations card stock again and I love all the different textures resulting from the embossing. The cotton reels, needle and thread dies are all from Memory Box and the dressmakers dummy and buttons were cut from Spellbinders dies. The cute sentiment is from a small stamp set by Waltzingmouse Stamps - I can see me using this a lot as it fits in so well with anything sewing related and I like the modern font. I'm pleased to say that this card was well received, so I expect I shall be making some more similar ones as the Papertrey Ink hexagonal cover plate die is really lovely to use, producing something that is just that little bit different.

Monday 11 November 2013

Core'dinations Hard Core Crop Challenges.

Core'dinations are holding a series of challenges this week and as usual I am at the last minute to get my entries in. I was late finding out about these challenges, but as I love using Core'dinations card I just had to join in.

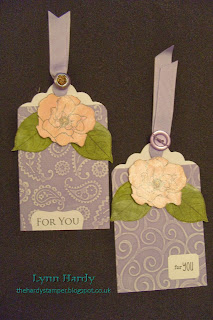
The first is for Kate Nolan's challenge - two stamped tags. I used two different Cuttlebug embossing folders to emboss patterns into two pieces of lavender coloured Core'dinations card then sanded the raised areas to reveal the lighter coloured core. These were then added to two tags along with some lavender coloured grossgrain ribbon, which I attached by tying buttons on with twine. The "For You" sentiments are both by Waltzingmouse stamps and were stamped onto white card which I cut to shape using Spellbinders dies.  The roses and leaves are from the "Roses in Bloom" stamp set by Waltzingmouse stamps.They were stamped onto white card, painted using watercolour paints which contain mica, fussy cut out then adhered to the tags using double sided tape for the leaves and foam pads for the roses to give them some dimension. Finally, you can't see on the photo, but I stamped "To" and "From" on the back of the tags, so that they are all ready to be used.


The second entry is for Tami Mayberry's CAS card challenge. I don't usually do "Clean and Simple" cards - mine are usually more elaborate creations and often take me many hours to make! CAS is a great idea for Christmas cards though, as it's much easier to make them in batches if the design is quick to produce. Here I used a piece of Kraft card to make the base of the card and then added a single layer of red Core'dinations card which I had embossed with a Cuttlebug embossing folder and sanded to reveal the paler core as before. I chose Memento Ladybug red ink to stamp the sentiment and ornament onto kraft card, which I then cut out using Spellbinders dies. Both stamps are from the "Vintage Ornaments" stamp set by Waltzingmouse Stamps - I love these as they all have corresponding Spellbinders dies and it makes it so easy to get great results! I used foam pads to raise up the ornament on the card, then embellished it with a row of sparkly red diamantes. It's at this point that I wanted to start adding ribbon etc, but we were only allowed to use no more than two embellishments, so that's it - my first ever CAS card!


My third entry is for Gail Linder's Patchwork inspired background challenge. This one is totally not clean and simple! In fact it took me well over eight hours to make but I am very pleased with the result. I selected seven different colours of Core'dinations card stock from the Whitewash collection and die cut them all with my Papertrey Ink "Happy Hexagons" coverplate. I decided to use the cream coloured one for the background grid, which I stuck to another layer of similar coloured card using double sided tape. Next I pushed out all of the little hexagons, half hexagons and triangles from the other six die cuts and embossed them all with a variety of embossing folders which had small designs. Each individual piece was then sanded to reveal the darker coloured core, which took ages, and as you can imagine I had sore fingers for a while too! The next step was to insert the hexagon shapes back into the grid, forming the lovely patchwork design for the background. This was then layered onto a piece of pale blue Core'dinations card, which I had sanded around the edge. The panel was then added to a white card blank and embellished with a narrow stitched ribbon and a sewing machine charm. I used the leftover bits of Core'dinations card to die cut the dress form with Spellbinders "S5 - 145 French Frills" dies. It's hard to tell in the photo, but the dress was then stamped using one of the co-ordinating stamps by Samantha Walker for JustRite Stampers (SW - 04105 Ooh La La French Frills) and Papertrey Ink's Fresh Snow ink. The buttons and scissors were also cut from scraps of Core'dinations card with Spellbinders dies and the needle and spool were made with Memory Box dies. I threaded the needle with baker's twine (which was then adhered to the card with double sided tape), used the same twine to "sew" the buttons and also wrapped some of it around the spool, before sticking everything onto the card using foam pads to add dimension. Finally I diecut another small hexagon, this time using the smallest Spellbinders hexagon die, stamped the sentiment (from JustRite Stampers) on it and stuck it in the top left of the card (again using a foam pad).  I really enjoyed making this card and have enough "bits" left over to make a few more with different coloured hexagonal grids. I am planning to send this one to a friend who loves sewing and who has a birthday next week - I hope she likes it!


The final card is for Clare Buswell's Quick and easy Christmas cards challenge.  Clare has just secured a place on the 2014 Design Team for Craft Stamper magazine - which was how I came to check out her blog and discover these challenges. I have much admired Clare's work previously - she used to be on the Waltzingmouse Stamps Design Team until recently and has some beautiful cards on her blog http://clare-buswell.blogspot.co.uk/ . I am really looking forward to seeing more of her wonderful creations in Craft Stamper next year.

I started off with a square kraft card blank and added a square layer of gold textured card. Then I selected a dark green sheet of Tim Holtz Kraft-Core from the Shattered collection and embossed it with the December Calendar folder from the Tim Holtz Alterations Texture Fades (by Sizzix). I also embossed a strip of "Old Paper" coloured Core'dinations card from the Tim Holtz and Ranger Distress collection, using the music border folder from Tim's smaller Texture Trades set. Both pieces were then sanded to reveal the core and layered onto the card base (on top of the gold layer). My chosen stamps were all from the "Santa's Coming to Town" set by Waltzingmouse Stamps. I filled the gap at the bottom left with the sillouette of Santa and the snippet of lyrics from the Christmas song (I used Memento Northern Pine ink). I chose a vivid red from the Core'dinations Brights collection to diecut my ornament shape with a Spellbinders die, then I stamped it with the co-ordinating image and sentiment using Memento Tuxedo Black ink. A thin strip of the gold card was attached to "hang" the bauble from (again using foam pads for dimension). I think the calendar looks really effective and I might make some more cards similar to this for Christmas.


EDITED: To add that the above Christmas card was chosen as the winning entry on Clare's blog. I am thrilled and have won a 12" x 12" Tim Holtz Seasonal Impressions Core'dinations card pack!
 
I really enjoyed taking part in these challenges and would have liked to have done more of them, but there were sixteen in total and I just didn't have the time. I hope that you like the four that I managed to finish!

Friday 8 November 2013

Happy Birthday Little Man ...

Our first grandson, Max, had his second birthday today and by all accounts he has enjoyed himself all day! We bought him a Lego airport set as he loves watching aeroplanes and his Mum and Dad took him to Legoland at the Trafford Centre for a birthday treat.

Here is the card I made him for his second birthday.


I started with an eight inch white card blank and added a layer of gingham patterned paper from the Petal Fresh collection by NitWit Collections for Lili of the Valley. Then I added a large square of pale blue card to represent the sky. I used Memory Box dies to cut the clouds from white card stock and the letters and numbers from blue card stock. I used a Zig 2 way glue pen to stick the sentiment onto the clouds, which I then stuck to the blue card base using double sided tape for two of the clouds and sticky foam pads to raise up the other two clouds.

Little Max is always asking to be taken to the airport so that he can watch the aeroplanes taking off and landing, so I was delighted when I found the "Little Man" mini clear stamp set from Kaisercraft http://www.thecraftbarn.co.uk/product.php/34741/kaisercraft-mini-clear-stamps-little-man . I stamped the cute aeroplane onto blue card stock four times, using Memento Danube Blue dye ink. Then I fussy cut each layer out and decoupaged them together using clear silicone, so that I could angle the wings etc. Whilst the silicone was drying I stamped the vapour trail using Papertrey Fresh Snow ink. Next I added a strip of double sided tape to the back of a piece of bright green card stock before using a Magnolia Doohickey die to cut out the strip of grass. Adding the tape before I cut the card made it so much easier when I came to stick the grass to the bottom of the picture!

Max also likes being held up to look out of the window so that he can spot the birds outside. For that reason hubby is known as "Birdy Grandad" so I just knew that he had to have some birds on his card too! These two are separate dies from Marianne design and I cut them both out of brown card stock. I then used a Versamark pen to colour the leaves on the branches and the wings and eyes of the two birds. Whilst the ink was still wet I applied some pearly pigment powders (I used Blonde Moments pigments powders, which I bought from Dyan Reavely at Art from the Heart some years ago) using a fine paintbrush. I brushed off the excess powder and polished with some tissue before adding the bird and branch die cuts to the card using my Zig 2 way glue pen. Finally I added the plane with a dab of silicone and angled it so that it looked like it was banking round. All done!

You do have to imagine that the birds are in the foreground - otherwise they are far too big and out of proportion to the plane - but hubby pointed out that as Max is only two he isn't likely to complain about the perspective just yet (although he is very clever)!

Welcome Little One...

I'd like to introduce you to the newest member of our family, our second grandson Joshua! He was born on 5th November, on what would also have been my dear Dad's birthday - and there were plenty of celebrations that night! Here is the lovely little man himself - the photo was taken when he was just a couple of hours old.


We went to visit Joshua and his proud Mum and Dad in hospital the following day. I took this photo of a very happy Grandad holding baby Joshua for the first time ...


Of course I had to claim a cuddle too! Baby Joshua is adorable and I was very reluctant to hand him back to his Dad (who took this photo) when it was time to leave.


This momentous occasion called for a special card from his Grandparents to welcome the little man. I had done my usual trick of crafting late into the night (or the early hours of the morning to be more precise) to create this card which we took with us to give to his Mum and Dad.


I  started with an eight inch square card blank, added an outer layer of pale blue card then two rectangles of floral and striped patterned paper from the Petal Fresh collection by NitWit Collections for Lili of the Valley. I used a Cottage Cutz lace border die to cut a long strip of white paper lace which I stuck across the full width of the card to cover the join in the different patterned paper (although you can only see a bit of it on the right hand side). I tied a double bow from "Queen Blue" coloured seam binding using my "Becca's Peg Bow Maker". This is one of the best gadgets I've ever bought! It makes it really easy to tie pretty bows with multiple loops etc. You can read more about it over on the very talented Becca Freeken's blog here http://www.amazingpapergrace.com/today-is-kind-of-special/ . I added a small nappy pin charm to the centre of my bow and adhered it to the card on top of the paper lace using double sided tape. 
 
The main stamped image is "Special Delivery" from Lili of the Valley http://www.liliofthevalley.co.uk/acatalog/Stamp_-_Special_Delivery.html , which I stamped onto smooth white card with Memento Tuxedo Black ink. I coloured the little bear with my Copic Ciao markers and blender pen then used one of my Spellbinder dies to cut the circle shape. This was layered onto a blue scalloped circle (also a Spellbinders die) and then onto another Spellbinders die cut circle - this time using the smallest die from the Grand Stately Circles set http://www.spellbinderspaperarts.com/products/p-907-grand-stately-circles.aspx. before adding it to the centre of the card.
 
The sentiment and flourish at the top of the card is from the Papertrey Ink "Boutique Borders: Birthday" small set https://www.papertreyink.com/index.php?p=catalog&mode=search&search_str=boutique+borders+birthday and the blue card I used to stamp it onto was cut with their co-ordinating die. I used two blue pearls from the Hobby House to embellish it either side of the sentiment.  The circular calendar image at the bottom is from Lili of the Valley http://www.liliofthevalley.co.uk/acatalog/Stamp_-_Calendar.html and I cut it out with a small Spellbinders circle die before customising it with Joshua's date of birth. Finally I die cut the letters to spell out Joshua's name using the same blue card and the "Classic Upper Alphabet Set" of dies from Memory Box http://memoryboxco.com/product_detail.asp?id=98361 . I also have the lower case and numeral sets and they are so useful for personalising cards - I'm sure you'll be seeing a lot more of them on here in the future! I used a Zig 2 way glue pen to adhere the letters to the bottom of the card and it was finished. 
 
I don't know what Joshua thought of his card, but he certainly looks peaceful here!


Welcome to the world little one!
  

Monday 4 November 2013

Papertrey Ink Make It Monday no 138: Inlaid Die-cuts.

I am joining in the Papertrey Ink Make It Monday challenge for the first time this week. Betsy Veldman has a great video tutorial here http://nicholeheady.typepad.com/capture_the_moment/2013/10/make-it-monday-138-insert-intro-paragraph-insert-video-insert-still-photos-if-you-are-joining-along-.html where she shows how to inlay die cuts to make cards which are easy to post. I was inspired to dig out my Papertrey stamps and dies and give the technique a try.

I chose the "Wonderful Words: Birthday" stamps and die, together with the small "friend" stamp from "Friends 'til the End" to make a colourful ombre style card.


I started by die cutting the birthday word out of four complementary colours of Papertrey Ink cardstock. I chose Aqua Mist, Spring Moss, Hawaiian Shores and Simply Chartreuse card and then stamped each word with the matching stamp in their corresponding ink colours. Then I took some smooth white card and die-cut the word birthday again four times, making sure that I lined them all up so that they were evenly spaced. The white words were removed and saved for another project then I turned over the card with the negative spaces and applied wide tape over the holes (I used normal packing tape for this). The card was then turned face up again and each hole was filled with one of the coloured words - starting with the lightest shade and the top and progressing to the darkest at the bottom. I had saved all the fiddly little insert pieces from the white card and painstakingly replaced them all inside the coloured words so that the background was entirely white. This took me ages but was well worth the effort I think, as the words really pop.

I used the matching ink pads to stamp the words "happy", "to you" and "friend" next to the inlaid die - cuts. The idea is that you sing the sentiment rather than read it as it's the words to the Happy Birthday song! I matted and layered the white card onto a rectangle of Hawaiian Shores cardstock and stuck that to a Limeade Ice card base. Finally I added sparkly rhinestones in four toning colours to add a little birthday bling!

This was a lovely technique to use - why don't you give it a try?