Friday 31 October 2014

Welcome Baby Lucas

Allow me to introduce our newest grandson, Lucas James. The photo below was taken when he was just one day old and was still in hospital. As you can see I am a very proud Grandma!


I wanted to make a card as a keepsake for his parents, so I started with an 8" square white card blank and added a layer of Core'dinations Tim Holtz Kraft-Core card from the nostalgic collection and some lovely patchwork effect paper (Little One from Kaisercraft's Pitter Patter collection). 

I chose the lovely Starry Bunny stamp from Lili of the Valley (ST 374) for the main focal point and stamped it onto smooth white card using Memento Tuxedo Black dye ink. I cut the panel using a Spellbinders label one die and coloured the image using Copic Ciao markers. The panel was then matted onto another Spellbinders decorative label one diecut and additional layers were coloured, fussy cut and decoupaged with clear foam pads to add lots of dimension. 


The photo below is a close up of the partially concealed tag which I cut from Kaisercraft paper for the front and Core'dinations card for the back, using the largest of the Waltzingmouse stitched tags dies. I left enough space on the tag for details of Lucas' birth to be recorded. 


The Starry Bunny panel was adhered to the card on three sides with foam tape, leaving space for the tag to be inserted. Although the photo below is a little out of focus, you can see the extra decoupaged layers which really make the bunny and teddy stand out.


The Special Day stamp is also by Lili of the Valley. Here it was cut with a Spellbinders circle die and layered onto another Spellbinders scalloped circle diecut. I used a co-ordinating Copic marker to highlight baby's date of birth. The ivy leaf corners were cut with Signature dies and the flowers (all from Wild Orchid) were arranged around the date details.


Finally I added Lucas' name with letters cut with Memory Box classic alphabet dies. Although the card was very time consuming to make, I am very pleased with the finished result and it was well received. 

I am entering this card in the Lili of the Valley October challenge, which you can find here .


The photo below was taken earlier today when Lucas was enjoying his play mat. He is three and a half weeks old now and is as cute as a button! Of course I may just be slightly biased!


Thanks for looking.

Lynn

Thursday 30 October 2014

Heartfelt Poppies

This is my second post today - please scroll down to read my Pink Roses and Sequins post.

The image on this card is a beautiful heart shaped poppy stamp from Indigo Blu. As today is the seventh anniversary of my dear Dad's passing this seems very appropriate, since poppies traditionally signify remembrance. I have fond memories of my Dad and miss him very much, but he loved his garden so I'm sure he'd have approved of this card.


I stamped the image onto smooth white card with black ink and coloured it with Distress Markers. I also stamped it onto some masking paper and fussy cut it out as close to the image as possible, so that I could mask the coloured image without having a white halo around it. Then I got busy with my Tim Holtz distress marker spritzer and the same markers that I'd used to colour the poppy image. This gave an air-brushed effect with tiny splatters providing lots of texture - and it was lots of fun to do too! I matted the panel onto poppy red card then onto green striped paper and a white card blank and it was finished. I decided to keep it simple and not to add any embellishments as I wanted this to be a sympathy card and have posted this to a dear friend who has just lost her lifelong friend.

I am entering this into the Indigo Blu Challenge no 21: Magical Masking - you can see all the details here on the Indigo Blu challenge blog

I'm also entering this on the Artful Times Challenge Blog for challenge 67: Poppies. 

Thanks for looking and don't forget to take time to remember a loved one.

Lynn

Pink Roses and Sequins

This week I have been busy card making as I need quite a few cards for various occasions over the next few weeks and I wanted to make a start on them before I begin making Christmas cards. I decided to make a batch of similar cards and started by cutting shaped card blanks from pearlised linen textured card using a Spellbinders Card Creator die.

I chose the triple rose three step stamps from Papertrey Ink's "The Sweet Life" stamp set for my focal point. The roses were stamped first with Memento Angel Pink ink, then Papertrey Sweet Blush ink, with the final layer being Memento Rose Bud ink. I used the matching dies to cut out the blooms, which I adhered to my cards using foam pads. The gold leaves were cut from mirror card using the three smallest dies from the Memory Box Tender Leaves set. The "Happy Birthday" sentiment was cut from the same mirror card using a Simon Says Stamp die and these were adhered with a small amount of Ranger's Studio matte multi-medium, as were the pink and gold sequins. 


The "Thanks" sentiment on the card below is also cut from a Simon Says Stamp die - I love the font used!


I ended up with a batch of two birthday cards and six thank you cards, so I'm very happy with the results!


I am hoping to be back later on today with another card. My blog posts are becoming a little like buses - you wait for ages for one then two come along at once - LOL! Thanks for looking.

Lynn

Wednesday 15 October 2014

Waltzingmouse October Pajama Party - Challenge 1. Texturise it.

Hello! Today I am joining in with the Waltzingmouse Stamps October Pajama Party - challenge 1 - Texturise it. You can check out the full details here http://waltzingmouse.blogspot.co.uk/2014/10/welcome-to-october-pj-party.html .

This challenge was to use embossed textures but without using an embossing folder. I decided to make my own embossing plate by cutting lots of the Gingerbread Family shapes using my WMS Cutting Edge dies.


I started by cutting lots of the smaller gingerbread boys and girls out of thick greyboard, so that I could use them to make an embossing plate. While I had the dies out I also cut several of each size and shape out of some self adhesive cork sheet, which was ideal as they looked like real gingerbread men!


I took a piece of smooth, thick greyboard and marked out the size of my card blank (5" x 7") in pencil. Inside that I marked out a 6" x 4" panel with a small border to represent the area which I wanted to emboss. The card was also divided vertically, horizontally and diagonally in order to assist with the placement of the tiny gingerbread boys and girls, which I stuck in place with some strong red - lined double sided tape. 


Here is the finished embossing plate complete with eighteen little gingerbread men in neat rows.


I took a piece of 6" x 4" Core'dinations red Kraft-Core card from the Tim Holtz Nostalgic collection and held it in place with some low tack masking tape to prevent it from moving as I passed it through my Grand Calibur machine (using the tan mat and pale pink embossing plate). The photo above shows the embossed piece before I sanded it to reveal the kraft core.


Here is my finished card, matted and layered onto a Kraft card blank with red paper and kraft gingham card. The cork gingerbread men were stamped with Versamark ink, coated with Zing Opaque White embossing powder and heat set to give the effect of icing. They turned out really textured too and I think they look very effective! The sentiment was from the same stamp set - Oven Fresh Gingerbread Joy - and was heat embossed onto a small stitched sentiment flag die cut from a Lil' inker designs die and using kraft card.

I'm very happy with my first Christmas card make of this year and I have enough pairs of Gingerbread men ready to make eight cards in total - so that's a result! Thanks for looking!

Lynn 

Monday 6 October 2014

Cupcakes galore and Happy Stampers at Port Sunlight.

I was lucky enough to be able to go to the Happy Stampers show at Port Sunlight on Saturday. I was really excited as I hadn't been to a show for ages and was missing seeing all my friends. An added bonus was the fact that Waltzingmouse Stamps were exhibiting there for the first time and I was looking forward to meeting the owner, Claire Brennan. I was also thrilled that my good friend Penny was able to attend for the first time, as she had recently moved up to the north west from the south coast and I hadn't seen her for about four years. Apologies for the large number of photos in this post, but I have lots to show you!

The day before (and inspired by the Great British Bake Off), I decided to make some cakes to take with me as gifts. I started by making a batch of carrot and walnut cakes with cream cheese frosting.


Then I made a big batch of toffee and date cupcakes, which were topped with buttercream, chocolate crunchies and Thornton's fudge.


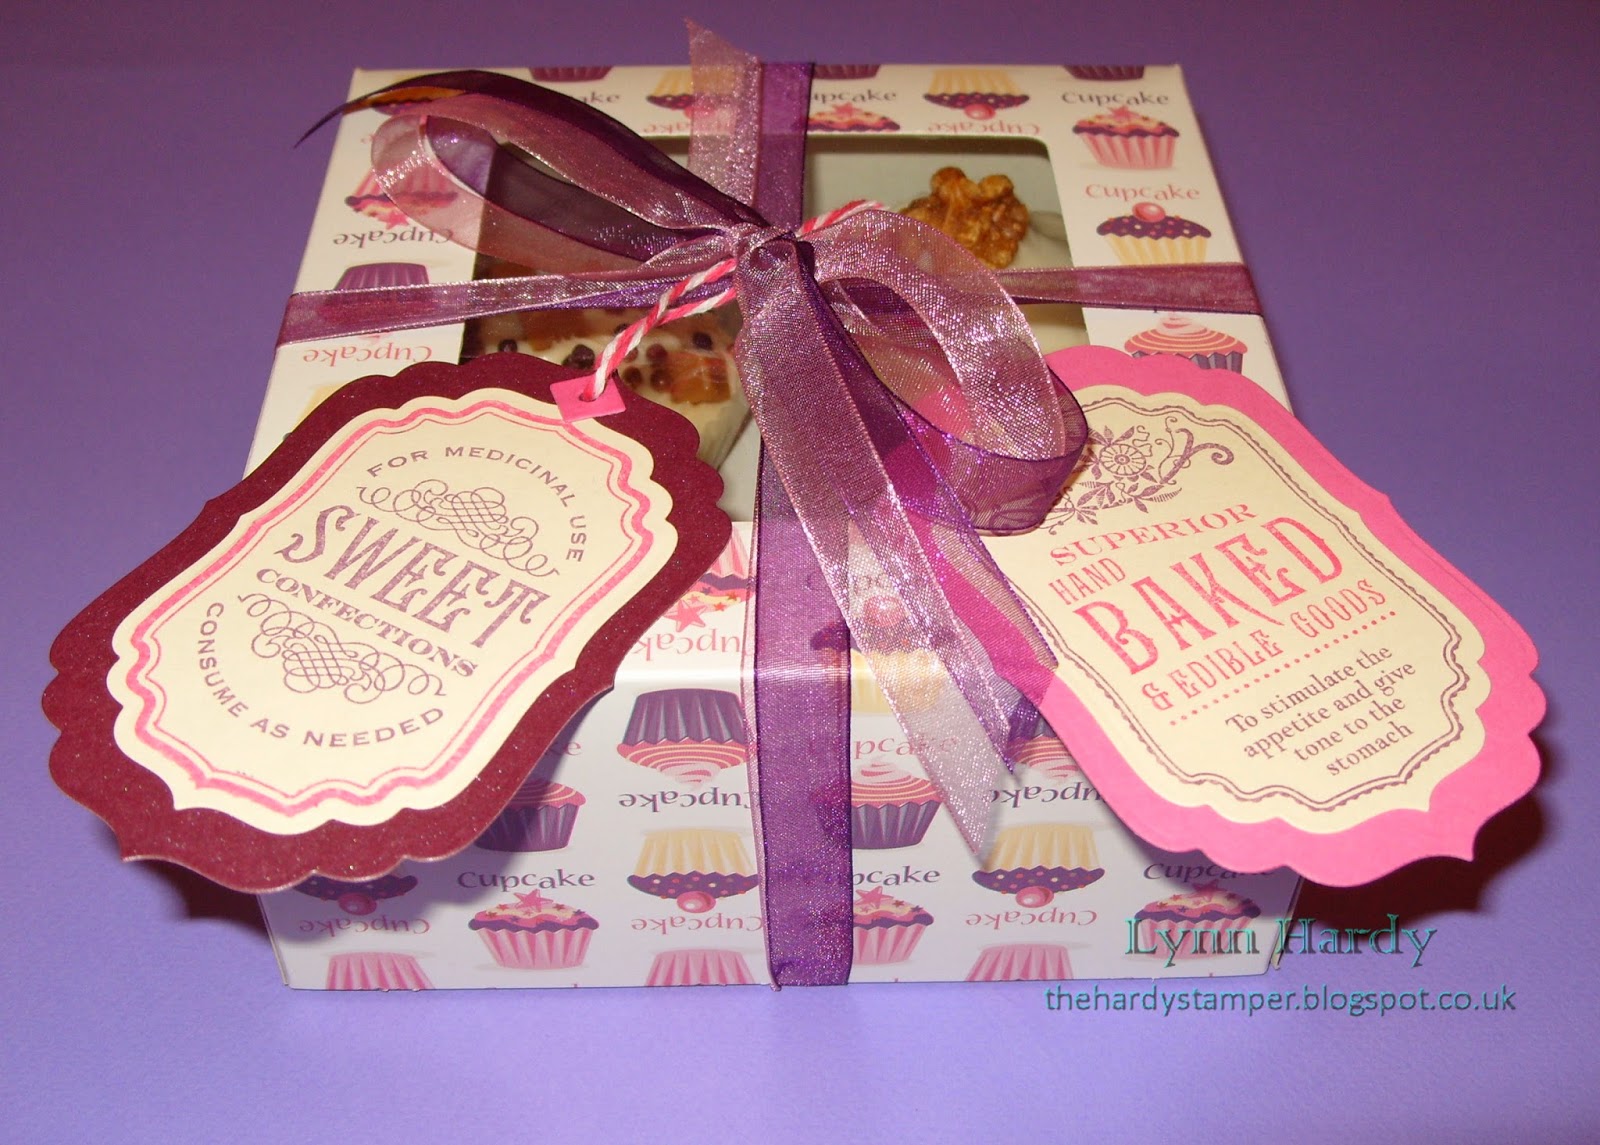
I packed a tin full of cakes to give to the lovely ladies of the Happy Stampers club, in appreciation of all their hard work (as volunteers) in organising the show at Port Sunlight twice a year. The labels were made with Waltzingmouse stamps from the Rescue Remedies set stamped with Memento dye inks and cut with Spellbinders Labels Four dies.


The photo below shows the reverse of the labels. I used Waltzingmouse Stamps - Country Labels 4, a sentiment from Tag Collection 1, the smallest cupcake from Frame It and the question from the Eat Cake set. The tops of the tags were completed with the addition of pairs of tiny grommets cut from the folding tag die set by Waltzingmouse Cutting Edge Dies. My lovely personalised tree stamp was a birthday gift from my daughter Jessica and was made by My Rubber Stamp in Texas, USA.


I had bought some pretty cake boxes from Morrisons supermarket. Each held four cakes and I tied them up with plum and pink organza ribbon and made the co-ordinating tags as above.


I hardly slept that night, but I was up bright and early to set off to Port Sunlight. I travelled by tram and bus to Manchester then a train to Liverpool, followed by a second train to the pretty village of Port Sunlight. Even the railway station below looked pretty!


The village of Port Sunlight was built by the philanthropist William Hesketh Lever (later Viscount Leverhulme) at the end of the 19th century in order to house workers from the nearby Lever Brothers soap factory (now the global company Unilever). Over thirty architects were employed to build the model village, resulting in buildings that were both beautiful and unique. The half timbered building below is used as the local tea rooms and is directly opposite the railway station.


The red brick building below has an unusual octagonal shaped tower and is situated to the far end of the road at the right of the photo above. 


Opposite, this lovely building has plenty of character, with leaded windows and black pebbles inset in rendered panels between the stonework. The surrounding hydrangeas looked beautiful too. 


This row of half timbered houses leads down towards Bolton Road, where Hulme Hall (the historical venue for the stamping show) is located. Unfortunately in my excitement to meet up with Penny and go inside I forgot to take any photos of Hulme Hall itself.


Once inside I distributed cupcakes to the Happy Stampers, a box to Jill and Sarah at The Stamp Man and a box to Claire and Sandie at Waltzingmouse Stamps. Now I had room in my bag to shop!


The photo below is of the lovely Claire from Waltzingmouse stamps and myself, which Penny kindly took for me. (This one is especially for you Jeanne)! Then I put my camera away and promptly forgot all about taking any more photos as we were so busy catching up, chatting and of course shopping!


I had the best time ever and really enjoyed the company, talking stamping all day and acquiring lots of new and interesting products to add to my stash! All the artwork samples were outstanding and there were plenty of demos to watch too. We loved what Sarah Anderson was doing with the Frantage kits at The Stamp Man and Penny and I bought a set each so that we can try it at home ourselves.

The rest of the photos below show my crafty haul from the show (there are quite a few of them, but please don't tell my husband)! First we have four packs of A4 pearlescent card, an 8" square Christmas paper collection, Graphic 45's 12" Twelve days of Christmas paper pad (at a bargain price) and four of the gorgeous Lili of the Valley NitWit collection pads.


These are the dies (Lawn Fawn, Impression Obsession and Spellbinders), alphabet stencil (Tim Holtz) and tree skyline mask (Clarity) that I bought. 


Below are a set of transport stamps and matching dies from Clearly Besotted - our eldest Grandson will love these as he is fascinated by planes and helicopters. The pack of ribbons was a freebie form Clearly Besotted too. On the right are the Zigzag background and Splat That stamps which I bought from Waltzingmouse. Claire added a lolly and some love hearts to my bag - you've got to love free sweeties!


Those of you who know me well will also know that I love Waltzingmouse stamps very much - so you may be thinking that I was very restrained in only buying two stamps from there. However, you would be wrong, as I have to confess to placing an order for the new releases just last Sunday and they arrived on Tuesday - see below! 


Other stamping purchases included the new Merry Christmas stamp and Chocolate gilding flakes from Kay at Indigo Blu, a JustRite Butterfly vines background stamp which I had been coveting since it was released and a very large and deeply textured Impression Obsession seashell and starfish background stamp. 


Our next visit was to Lavinia stamps where I bought two packs of SceneScapes background cards and two very detailed stamps. I can't wait to use the tree branch stamp together with the new squirrel dies for an autumnal card!


We both bought a spray to assist with die cutting intricate shapes (I hope it works). I also got a new Archival inkpad, a Gelatos set (reduced) and the Frantage encrusted jewel kit that I mentioned earlier.


Finally, I visited Paper Artsy just before the show closed and added to my collection of Fresco paints and Treasure Gold waxes - Spanish Topaz (top), White Fire (middle) and limited edition Lilac (bottom). The stamp and swivel clip were freebies from Mark and Leandra :) 


I suspect that I shall be on a stash ban for the foreseeable future, but I have plenty of new goodies to play work with and I am inspired to start creating again as soon as possible. If you have managed to read this far - thank you very much! 

Lynn