Saturday 29 November 2014

Text Me!

I treated myself to a set of the Clearly Besotted Text Me stamps recently as I thought they would be ideal for making cards for young people and would be suitable for male cards too. I needed a couple of birthday cards so I made a batch of six cards, using C6 black card blanks and a variety of Spellbinders and Cuttlebug embossing folders for the yellow backgrounds. 


I stamped the phone and headphones onto black card with Versamark ink and heat embossed them using clear embossing powder. There are actually a matching set of dies for these stamps, but since I don't have them yet I fussy cut everything out by hand. I put some double sided tape onto the back of the stamped headphones before I cut them out, which made it much easier to stick them to the cards afterwards! I used Memento Tuxedo Black dye ink to stamp the various text messages and icons onto lemon yellow card, cut them out and stuck them to the phones with strong double sided tape. The phones were then added to the cards with foam pads for dimension.  


Below you can see all six of my cards, with their different embossed backgrounds. As usual you can click on any of the photos to get a clearer view.


I am really pleased with the finished results, even though the headphones took me ages to cut out! Each card also has a white insert inside, for ease of use. 

I am entering one of these cards into the Simon Says Stamp Wednesday challenge - you can find all the details here . 

Thanks for looking,

Lynn.

Wednesday 26 November 2014

Cure For The Monday Blues Challenge # 35 - Leaves an Impression.

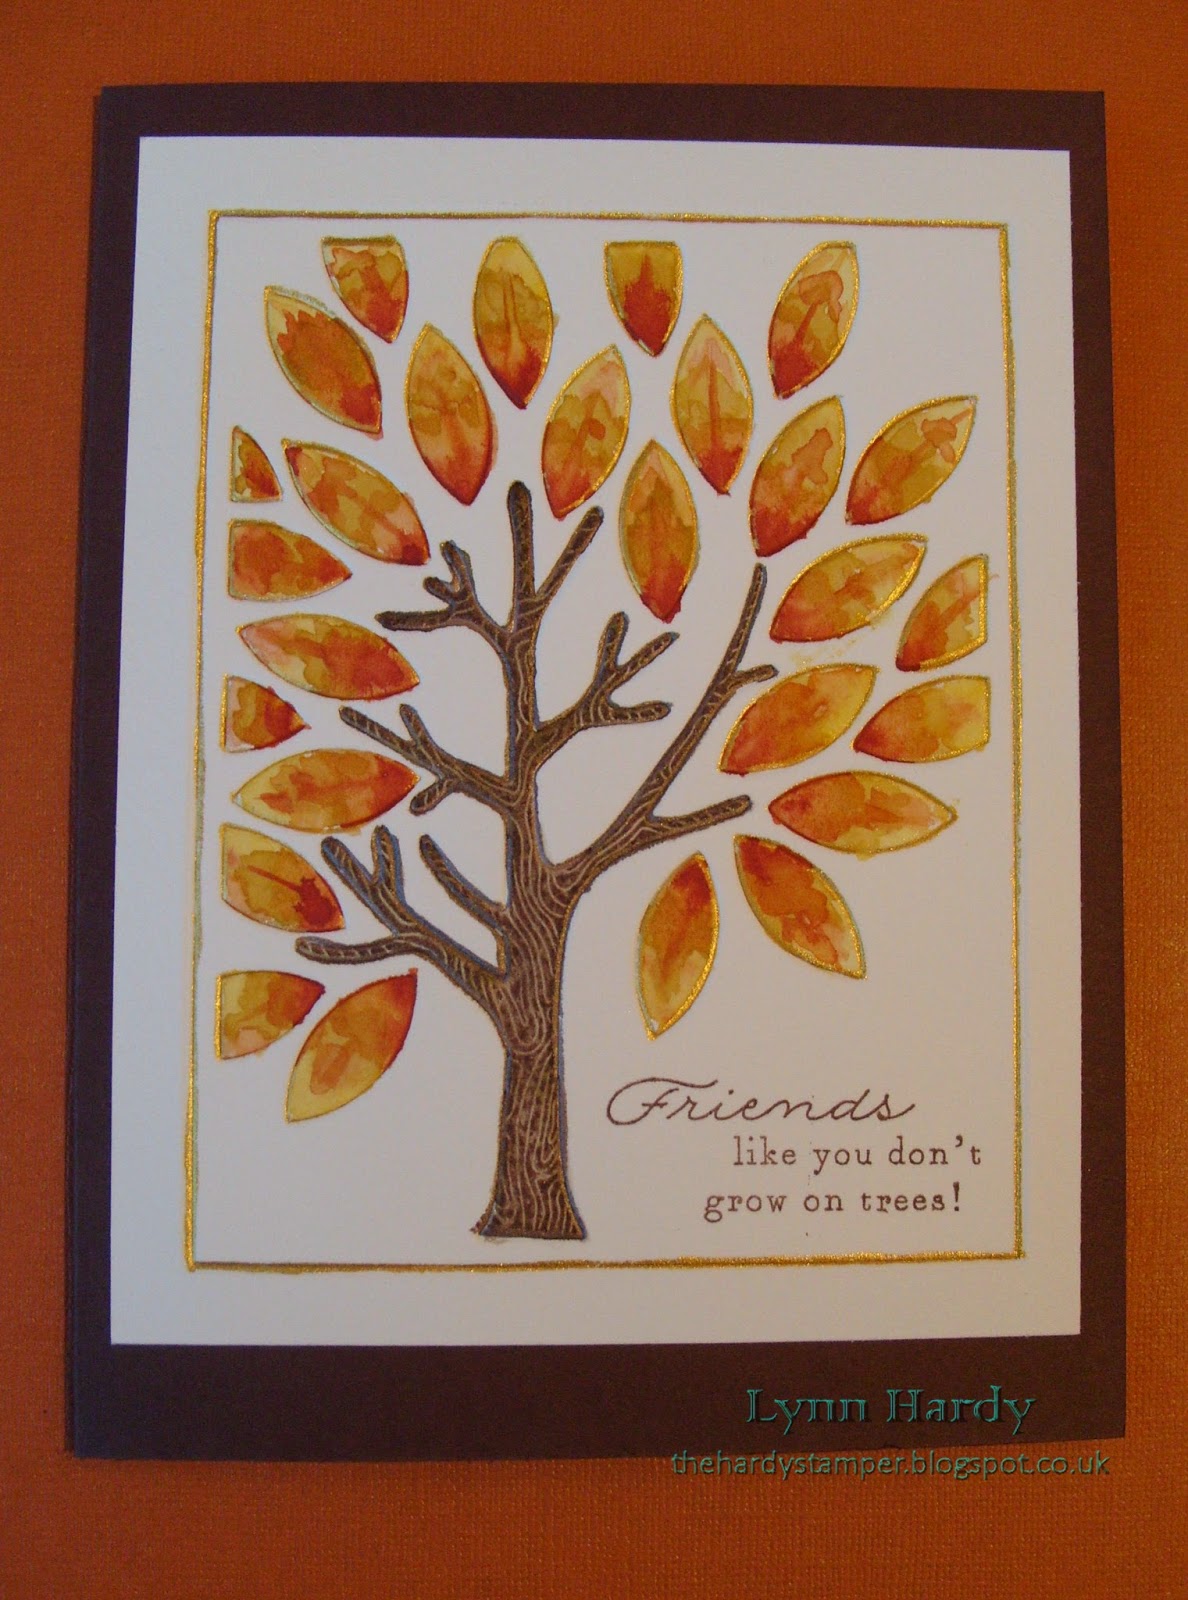
Today I am joining in with Taheerah's Cure for the Monday Blues Challenge #35. You can find all the details on her blog here . This week the inspiration photo shows a dining room with a delightful chandelier bedecked with falling autumn leaves, so I took the leaves as the starting point for my card.


I started by embossing the Papertrey Mighty Oak coverplate onto some Bockingford Watercolour paper. Then I took a very fine paintbrush and painted all the outlines with Rich Cocoa and Solar Gold Twinkling H20 paints. When this had dried I used my regular watercolour paints to colour the tree trunk and autumn leaves, varying the colours of the leaves as I went. The tree trunk was then overstamped with the corresponding stamp from the Mighty Oak stamp set (this is such a lovely set and I'm sure I will be using it lots more in the future too). The sentiment (from the same stamp set) was added with Rich Cocoa Memento dye ink. The entire panel was then simply added to a Dark Chocolate card blank with lots of strong double sided tape to prevent warping.

Please click on the photo above for a larger view. 

I am thrilled with how this card turned out! It's certainly unique and an added bonus was that it was flat for posting. It has already been sent off to a dear friend in the USA - I hope that they like it too!

Thanks for looking,

Lynn.

Tuesday 18 November 2014

Cure For The Monday Blues Challenge # 34 - Child's Play

Hello! Today I am joining in with Taheerah's Cure for the Monday Blues challenge number 34. You can find all the details here .

This week's inspiration photo chosen by Taheerah is a bright and cheerful child's bedroom. I decided to focus on the pink chevron bedding, the zig - zag shape on the white wall, the tiny triangles and the little house at the bottom right of the photo.


I started with a 6" square white card blank, Memento dye inks in Angel Pink and Tuxedo Black, Versamark ink, Papertrey Ink in Melon Berry, Ocean Tides and Fresh Snow, some WOW Sparkling Snow embossing glitter and some Ranger Distress Stickles in Picket Fence. I decided to use the lovely Alpine Christmas stamps and matching dies from Waltzingmouse Stamps, together with their big zig zag background stamp. 

Please click on photo for an enlarged view.

I stamped some of the very small snowflakes directly onto the top of the card blank with Angel Pink ink, then I used the same ink to stamp the zig zag background onto some white card. I used the mountain range die to cut the top of the card panel then stamped the mountains with versamark ink and heat embossed with WOW Sparking Snow embossing powder. I also diecut a house and three snowflakes which were then overstamped. The snowflakes were heat embossed and the windows of the house were coloured in with a yellow Copic Ciao marker pen. I stamped the sentiment in black and added the tiny triangular trees and the smaller houses nestling amongst them. Finally I adhered the panel to the card with foam tape for dimension and added some Picket Fence distress stickles to the mountain ridge, snowflakes and the roofs of the houses.

It's much more sparkly and dimensional in real life, but my photo doesn't do it justice! Thanks for looking.

Lynn

Monday 17 November 2014

Papertrey ink Make it Monday challenge # 188: Stamping Ombre Backgrounds

Over at the Papertrey blog Laura Bassen has a video tutorial and a challenge for stamping ombre backgrounds - you can check out all the details and the video here .

I am joining in the challenge today with a tent fold A5 size card, using the Papertrey ink Rustic Snowflakes stamp set for the ombre background and the Shape Up Snowman dies and matching accessories stamps for my focal point.

Please click on the photo for an enlarged view. 

Using the long solid snowflake stamp I stamped the background in eight different colours, overlapping them slightly as I went. I chose (from top to bottom) Enchanted Evening, Blueberry Sky, Spring Rain, Sweet Blush, Lavender Moon, Plum Pudding, Royal Velvet and True Black inks on white card. I trimmed the panel and layered it onto some mottled grey card before adhering to my card blank. The sentiment (also from the Rustic Snowflakes set) was stamped in black onto a banner cut from the mottled grey card then added to the card with foam tape.

The snowman and accessories were diecut from white card then stamped in coordinating colours. I added a touch of Orange Zest ink for his carrot nose too. His twig arms were diecut from Dark Chocolate card. I used double sided tape to assemble him and stick him to the card base, with some extra foam tape for the top of his hat and his mittens. I drew the "string" holding his mittens with a fine blue marker pen and painted his three buttons with a little Spring Rain ink. 

I'm really happy with how my snowman card turned out - I hope you like it too!

Lynn.

Saturday 15 November 2014

Waltzingmouse Stamps November Pajama Party - Challenge 3, Old Pajamas

This is my fourth post today - please scroll down for my two Runway Inspired Challenge posts.

I am back again this evening to join in with the Waltzingmouse November Pajama party. You can find all the details here

The third challenge is to create a card using some of the older Waltzingmouse Stamps. I chose to use the Folk Art Medallion set and the Folk Art Christmas Additions set. I stamped using Memento Gray Flannel dye ink and PTI Pure Poppy Dye ink (second generation stamping).


I layered my background panel onto some Pure Poppy card and a 5" x 7" white tent fold card blank. The sweet deer was stamped in Pure Poppy ink and cut with the matching die. I added a small black pearl for his eye and mounted him to the card using clear foam tape for dimension. The sentiment was stamped in black on a panel cut with the Pretty Panel Two die. I think my deer looks suitably festive!


Thanks for looking,

Lynn.

Waltzingmouse Stamps November Pajama Party - Challenge 1, Scandi Tags

This is my third post today - please scroll down for my two Runway Inspired Challenge posts.

I am back this evening to join in with the Waltzingmouse November Pajama party. You can find all the details here

The first challenge is to create tags with a Scandinavian theme. I decided to make three tags in different colours, all using the Waltzingmouse Nordic Winter stamp set and Fresh Snow pigment ink. 


To each tag I added a white snowflake, which I had cut from the WMS Snowflake Three die and I embellished them with coloured gems in the centres to match the colour of the tags. Finally I added some white textured ribbon and a matching button (fastened with WMS button twine) to each tag. I am really happy with how these turned out - I hope that you like them too!

Lynn.


Runway Inspired Challenge # 71 - In Memory of Oscar de la Renta (part 2)

This is my second post today and is the second part of my entry for the Runway Inspired Challenge in memory of the designer Oscar de la Renta who died recently. You can find all the details on the Runway Inspired Challenge blog here .


I chose the photo below as my inspiration,  as did Taheerah - *Fill Your Paper With The Breathings of Your {Heart}*.


I used the same Wendy Vecchi stamp from the Art Colors Life stamp set as previously, together with the same three Distress ink markers (Mowed Lawn, Fired Brick and Squeezed Lemonade). However this time I coloured the stamp with the markers then spritzed it with a fine mist of water before stamping it onto some Bockingford Watercolour paper. This gave a lovely mottled look to my background, which I then layered onto a panel of green card and a 6" square white card blank. 


The photo below shows the background stamping, which looked really pale and pretty.


I then repeated the process, but this time I wet the Watercolour paper before stamping, which gave a really mottled look. I thought that the green looked a little like the branches of a Christmas tree with red and yellow lights on it, so I used this paper to cut out two tree shapes using Dee's Distinctively Christmas Tree Silhouette and Christmas Tree No 3 dies.


Using a damp paintbrush I added a little more distress ink in places where it was pale, until I had a more even coverage. Here you can see the two trees before I layered them onto my card using clear foam tape for dimension.


Again I stamped the sentiment, from Waltzingmouse Stamps Vintage Ornaments set in Memento Tuxedo Black dye ink and my card was complete. Two totally different cards using the same stamps and inks, but different techniques! I think that this watercoloured one is my favourite of the two. I hope you like them. Thanks for looking.

Lynn

Runway Inspired Challenge # 71 - In Memory of Oscar de la Renta (part 1)

This week I decided to play along with the Runway Inspired Challenge in memory of the designer Oscar de la Renta who died recently. You can find all the details on the Runway Inspired Challenge blog here . This time there were a number of inspiration photos to choose from, as each member of the Design Team had selected an item of clothing from the Spring 2015 collection to feature. 


I really liked this dress, which was chosen by Taheerah*Fill Your Paper With The Breathings of Your {Heart}*
Taheerah made a gorgeous card (in fact she made two) - do check out the blog to see her lovely work!


Not to be outdone, I decided to make two cards as well. In actual fact I selected a large background stamp from Wendy Vecchi's Art Colors Life stamp set, together with Distress ink markers (Mowed Lawn, Fired Brick and Squeezed Lemonade) and tried two different techniques. I liked them both, hence the two cards!
Below is the first one, with a trio of layered Christmas trees.


I inked the stamp up using the Distress markers and stamped directly onto a 6" square white card blank.


I also stamped the same image onto a separate piece of white card and used this to die cut my trees with the Dee's Distinctively Christmas Stacker Tree dies. I also cut matching trees from bright green card and layered them all up with double sided tape.


Finally I stamped the sentiment, from Waltzingmouse Stamps Vintage Ornaments set in Memento Tuxedo Black dye ink. I shall be back soon with my second card. Thanks for looking.

Lynn

Wednesday 12 November 2014

Leafy birdhouse card

One of my Aunties had her birthday yesterday and I made her the card below using several products from Imagination Crafts. I started with one of their 6" square pre-printed panels, which had a leafy shadows design in various shades of blue and green. I used masking tape to hold the leaf swirl border stencil in place, then added a thin layer of soft sage stencil paste with a palette knife. I removed the stencil and set the panel aside to dry for a few hours. The stencil paste was quite wet and seemed to leave a residue on the glossy card stock, so I think in future I would probably stick to using normal card instead, which would be more likely to absorb any excess moisture. Once the panel had dried I edged it with a jade coloured Copic marker to cover the white edges and provide a contrast against the white card blank beneath.


The stamped centre panel was made using a set from the Decoupage Stamp range. The centre of the leafy frame had a script background originally, but I decided to cut it out carefully with a craft knife, so that you could see the patterned card beneath. I stamped the main image three times using Memento Tuxedo Black dye ink, then I coloured them using Copic Ciao markers (G000, G21, BG72 ,BG93, W1, W5, Y000, YG03 and B24). The layers were then carefully cut out and layered up on clear foam pads to add lots of dimension. There was an extra little bird stamp in the set, so I gave her the same treatment and popped her inside the hole of the birdhouse, so that she was looking out at her mate. You can see the 3D effect in the close up photo below.


I used the same stamp set to decorate the inside of the card - the sentiment is also included so it's great value. I really like this stamp set as it reminds me of the pair of blue tits that nest in the box on our shed each year. We love to watch them flying in and out, trying to keep up with feeding their hungry brood!


Finally, I'll leave you with a photo of a single climbing red rose, which I took in our garden yesterday. We have an arbour with climbing roses, which we planted in memory of my Dad and David's parents. Usually the roses only bloom in the summer, but it has been fairly mild here recently. I was still surprised to see this single beautiful bloom in November though! I think that it was very appropriate that it appeared on Remembrance day and I'm sure that it was a sign from my Dad to show that he is watching over us.


Thanks for looking.

Lynn.

Sunday 9 November 2014

Cure For The Monday Blues # 33

I am joining in with Taheerah's Cure for the Monday Blues challenge no 33 this week - you can find all the details here. There is a lovely Autumnal inspiration photo with lots of berries this week.


My card features the lovely Stampendous Snowbird stamp which I stamped onto watercolour paper using Tree Branch Archival ink then watercoloured with Memento dye inks. I used Toffee Crunch, Canteloupe, Morocco and Lady Bug. I edged the panel with the Morocco ink and added it to my A5 card base with double sided tape. 


The background was stamped with a small leaf and berry sprig stamp from Waltzingmouse Stamps Paris Nouveau stamp set and the same Memento dye inks. The sentiment is from Waltzingmouse stamps Complements of the Season set and was stamped in Memento Tuxedo Black. 


Below you can see the finished background. It took ages to do as the stamp was inked up each time with  Memento markers, but I am really pleased with the end result as I think it looks really effective. I shall certainly be trying this technique again.


Thanks for looking.

Lynn

Saturday 8 November 2014

An Aviation Birthday

Today our eldest grandson Max has his third birthday, so I needed to make him a special card. He is fascinated by all sorts of aircraft and is very knowledgeable for such a tender age. I was admonished by him when I showed him a photo of a helicopter in one of his books - "it's not a helicopter Grandma - it's a Sea King"! Similarly he can tell a Spitfire from a Hurricane etc, whereas I just see a 'plane! We think he might end up being a pilot when he grows up.

So clearly an aircraft card was called for and Clearly Besotted's Take Flight stamps and matching dies were just perfect for the job.


I used a 6" square white card blank and layered some Core'dinations card from the Tim Holtz Kraft Core Nostalgic collection. This was topped with some pretty cloud patterned paper from the "Up, Up & Away" NitWit collection by Lili of the Valley. The letters were cut from the Core'dinations card using the Memory Box Classic Alphabet Upper Case dies and adhered to the card with a dab of Ranger's Studio multi-medium matte.

The aircraft, banners and sentiments were stamped onto smooth white card with Memento dye inks (Love Letter, Tuxedo Black, Tangelo, Dandelion and London Fog). I tried to match the aircraft colours to some of the characters from Disney's Planes (Blade Ranger, Dusty and Leadbottom) as Max is very fond of those too. The coordinating Take Flight dies made it really easy to cut everything out and there is even a little separate stamp for the banner strings, which I stamped directly onto the patterned paper. Everything was stuck onto the card with double sided tape and clear foam pads in selected areas, to add dimension and make it look like the planes were banking round.

I was really pleased with how this turned out and I hope that little Max liked it too.


Here is the birthday boy, modelling the cute aviator hat that his Auntie Jess bought him for his birthday.


We bought Max the matching aviator jacket to match and he looked so cute in his new outfit. Here he is with his Daddy trying to salute. I love the photo below - he looks so pleased with himself!


Thanks for looking.

Lynn

Wednesday 5 November 2014

Remember, Remember the 5th of November

Today would have been my Dad's birthday, so for the last few years I have felt sad on 5th November and always think of him when the fireworks are going off. However, last year our second grandson Joshua was born on 5th November - which was really lovely - so now it's a happy day again. 

Of course I had to make Joshua a birthday card to mark the occasion! I used an 8" square white card blank and added a layer of Core'dinations Tim Holtz Kraft-Core card from the nostalgic collection and some lovely script effect paper (from Kaisercraft's Pitter Patter collection). 

I chose the cute Baby Boy stamp from Lili of the Valley (ST 020) for the main focal point and stamped it onto smooth white card using Memento Tuxedo Black dye ink. I cut the panel using a Spellbinders label die and coloured the image using Copic Ciao markers. The panel was then matted onto another Spellbinders decorative label diecut which was adhered to the card using foam tape. 


The "Happy Birthday" sentiment was cut from the same Core'dinations card using a Simon Says Stamp die and this was adhered to the card with a small amount of Ranger's Studio matte multi-medium. The letters were cut using the Memory Box Classic Upper Case alphabet dies, as was the number 1, which I cut seven times and then stuck them all together to add more dimension to the number. The final touch was some aqua and white bakers twine and a matching button. The photo below shows the image and number in more detail. 


The birthday boy had a party on Sunday and was suitably spoilt by the whole family! Here he is opening the present that we bought him ( a huge activity cube that is bigger than he is)!


This photo was taken as Joshua was about to blow the candles out on his birthday cake. He was a little unsure of this as after all he's never had to do it before!


Joshua was still grinning from ear to ear when we left, so I think he enjoyed his first party (we certainly did)!

Thanks for looking,

Lynn

Tuesday 4 November 2014

Couture Birthday Card

I have just realised that I didn't share the twenty - first card that I made for my daughter back in the summer, so it's time to put that right! Jess is studying Costume as part of her University course - so what better papers to use than the wonderful Graphic 45 Couture collection?

A word of warning though - if you are a fan of clean and simple (CAS) cards please look away now! Clean and simple this is not! In fact I would go as far as to say that this is one of the most elaborate cards that I have ever made and it took me several days to complete. To give you some idea, there were a total of twenty - two different dies used on this card - some of them more than once!

I started off with an A5 card blank, portrait style, with a top fold. I added fleur-de-lis borders to the longer sides, which I had cut from black glitter card using a Spellbinders die. Then came a layer of turquoise pearlescent card, followed by several panels of the Couture papers by Graphic 45. The ric-rac border at the bottom of the card was cut using a Papertrey die and I used a white gel pen to add the faux stitching.


The next two photos show the top of the card, where I wanted to hang bunting to create a party feel. I used three of the dies from JustRite's Buntings and Button dies set with more of the lovely Couture papers to make the pennants and scalloped bunting. These were layered using clear foam tape then tied together with narrow black polka dot ribbon, forming six tiny bows. 


The top pelmet of turquoise hearts was cut from a Memory Box die and topped with a Spellbinders Fleur-de-lis in black glitter card. The photo below shows how I used several black foam dots to raise the centre of the pelmet to give it a curved shape. Two small ribbon bows were added to the ends to make it look like the ribbon had been used to tie up the bunting.


The main stamped image is one of the Prima doll stamps by Julie Nutting, which I stamped, coloured with Copic Markers, paper pieced and decoupaged. I heat embossed the dress portion of the stamp four times onto another of the Couture papers, fussy cut them and decoupaged the layers with clear foam pads at the bust and hemline. I also added some tulle netting gathered at the hemline to make it a real party frock! The party hat, bow belt and shoes were also decoupaged and I painted them with some Tattered Angels Tide Pool Glimmer Glam Glitter paint for added sparkle. Three turquoise gems completed the party crown and some narrow gold beaded trim made the perfect necklace and bracelet - every party girl needs a bit of bling!


The photo below shows the dimension achieved from all the layering on the skirt of the dress (sorry it's a bit out of focus).


The panel for the sentiment was cut from two more Couture papers using Spellbinders labels dies. I added a larger Fleur-de-lis to the top and bottom of the panel and mounted it onto the card with foam tape. The "happy" die cut is from a Simon Says Stamp die and the numbers and letters are all cut using Memory Box Classic number and alphabet dies (both upper and lower case).


The bottom right of the card was finished off with a bouquet of co-ordinating flowers. The white gypsophila, turquoise blossoms and variegated leaves were from Wild Orchid. I made the six other flowers myself using Spellbinders Bitty Blossoms dies and more of the Couture papers. I used a cocktail stick to curl all the petals before securing with glue, then I added either a tiny turquoise pearl or a gem to the centre of each flower. A couple of diecut flourishes completed the arrangement.


The photo below gives you some idea of the dimension added (sorry it's a bit out of focus again).


A final look at the finished card. I was so happy with how this turned out and my daughter loved it too!


Thanks for looking.

Lynn